
Главная страница Случайная страница
КАТЕГОРИИ:
АвтомобилиАстрономияБиологияГеографияДом и садДругие языкиДругоеИнформатикаИсторияКультураЛитератураЛогикаМатематикаМедицинаМеталлургияМеханикаОбразованиеОхрана трудаПедагогикаПолитикаПравоПсихологияРелигияРиторикаСоциологияСпортСтроительствоТехнологияТуризмФизикаФилософияФинансыХимияЧерчениеЭкологияЭкономикаЭлектроника
Valve clearance Adjustment Chart so [ 9Л I . I Exhaust valve.
|
|
1.17 ~ 1.21 1.22 ~ 1.28
1. Measure the clearance (when engine is cold).
2. Check present shim size.
3. Match clearance in vertical column with present shim size in horizontal column.
4. Install the shim specified where the lines intersect. This shim will give the proper clearance.
Example: Present shim is 3.10 mm.
Measured clearance is 0.40 mm. Replace 3.10 mm shim with 3.25 mm shim.
5. Remeasure the valve clearance and readjust if necessary.
CAUTION_______
Be sure to remeasure the clearance after selecting a shim according lo the table. The clearance can be out ol the specified range because of the shim tolerance.
NOTE
| SPECIFIED CLEARANCE/NO CHANGE REQUIRED |
| 0.32 ~ 0.36 |
| INSTALL THE SHIM OF THIS THICKNESS imml |
О If the valve clearance is smaller (larger) than the standard, select a thinner (thicker) shim and then measure the clearance again.

| ET21A |
Valve Removal
• Remove the cylinder head (see Cylinder Head Remvoal). •Swing open the rocker arm.
О Mark and record the shim locations so that the shims can be installed in their original positions.
• Using the valve spring compressor assembly, remove the valve.
Special Tooto- Valve Spring Compressor Assembly: 57001-241 [A] Valve Spring Compressor Adapter, Ф22: 57001-1202
[B]
Valve Installation
• Replace the oil seal with a new one.
•Apply a thin coat of molybdenum disulfide grease to the valve stem before valve installation.
• Install the springs so that the closed coil end faces downwards.
[A] Valve Stem [E] Retainer
[B] Oil Seal [FJ Split Keepers
[C] Spring Seat [G] Closed Coil End
[D] Spring
Valve Guide Removal
• Remove:
Valve (see Valve Removal) Oil Seal Spring Seat
• Heat the area around the valve guide to 120 - 150[3]C (248 ~ 302 " F), and hammer lightly on the valve guide arbor [A] to remove the guide from the top of the head.
Special Tool - Valve Guide Arbor, Ф4.5: 57001-1331
Valve Guide Installation
•Apply oil to the valve guide outer surface before installation.
• Heat the area around the valve guide hole to about 120 - 150 °C (248 ~ 302 " F).
• Drive the valve guide in from the top of the head using the valve guide arbor. The circlip stops the guide from going in too far.
Special Tool - Valve Guide Arbor, Ф4.5: 57001-1331
• Ream the valve guide with valve guide reamer [A] even if the old guide is reused.
Special Tool - Valve Guide Reamer, Ф4.5: 57001-1333
\/а/ve-to-Guide Clearance Measurement (Wobble Method)
If a small bore gauge is not available, inspect the valve guide wear by measuring the valve to valve guide clearance with the wobble method as indicated below.
• Insert a new valve [A] into the guide [B] and set a dial gauge against the stem perpendicular to it as close as possible to the cylinder head mating surface.
• Move the stem back and forth [C] to measure valve/valve guide clearance.
О Repeat the measurement in a direction at a right angle to the first.
*lf the reading exceeds the service limit, replace the guide.
NOTE
OThe reading is not actual valve/valve guide clearance because the measuring point is above the guide.
Valve/Valve Guide Clearance (Wobble Method)
Standard Service Limit
Inlet 0.031 - 0.113 mm 0.32 mm

|
Exhaust 0.090 - 0.171 mm 0.37 mm
Valve Seat Inspection
•Remove the valve (see Valve Removal).
•Check the valve seating surface [A] between the valve [B] and valve seat [С].
О Measure the outside diameter [D] of the seating pattern on the valve seat.
* If the outside diameter is too large or too small, repair the seat (see Seat Repair).
Valve Seating Surface Outside Diameter
Standard: Inlet 28.4 ~ 28.6 mm
Exhaust 24.4 - 24.8 mm
0Measure the seat width [E] of the portion where there is no build-up
carbon (white portion) of the valve seat with a vernier caliper. *lf the width is too wide, too narrow or uneven, repair the seat (see Valve Seat Repair).

|
Valve Seating Surface Width Standard: Inlet, Exhaust 0.5 ~ 1.0 mm
Valve Seat Repair
•Repair the valve seat with the valve seat cutters.
Special Tools - Valve Seat Cutter Holder. Ф4.5: 57001-1330 Valve Seat Cutler Holder Bar 57001-1128
[For Inlet Valve Seat]
Valve Seat Cutler, 45° - Ф32: 57001-1115 Valve Seat Cutler, 32" - Ф30: 57001-1120 Valve Seat Cutler, 60" - Ф30: 57001-1123 [For Exhaust Valve SeatJ
Valve Seal Cutter, 45" - Ф27.5: 57001-1114 Valve Seal Cutter. 32° - Ф28: 57001-1119 Valve Seal Cutter. 60° - Ф30: 57001-1123
*lf the manufacturer's instructions are not available, use the following procedure.
Seat Cutter Operation Care:
1. This valve seat cutter is developed to grind the valve for repair. Therefore the cutter must not be used for other purposes than seat repair.
2. Do not drop or shock the valve seat cutter, or the diamond particles may fall off.
3. Do not fail to apply engine oil to the valve seat cutter before grinding the seat surface. Also wash off ground particles sticking to the cutter with washing oil.
NOTE
О Do not use a wire brush to remove the metal particles from the cutter. It will take off the diamond particles.
4. Setting the valve seat cutter holder in position, operate the cutter in one hand. Do not apply too much force to the diamond portion.
NOTE
О Prior to grinding, apply engine oil to the cutter and during the operation, wash off any ground particles sticking to the cutter with washing oil.

|
5. After use, wash it with washing oil and apply thin layer of engine oil before storing.
Marks Stamped on the Cutter:
The marks stamped on the back of the cutter [A] represent the following.
60" Cutter angle [B]
37.5Ф........................................ Outer diameter of cutter [C]
Operating Procedures:
• Clean the seat area carefully. •Coat the seat with machinist's dye.
• Fit a 45" cutter into the holder and slide it into the valve guide.
Widened width of
engagement by machining Ground volume

|
• Press down lightly on the handle and turn it right or left. Grind the seating surface only until it is smooth.
OTo make the 32° grind, fit a 32* cutter into the holder, and slide it into the valve guide.
OTum the holder one turn at a time while pressing down very lightly. Check the seat after each turn.
_________________________ CAUTION______________ ___________

|
The 32° cutter removes material very quickly. Check the seat outside diameter frequently to prevent overgrlndlng.
О After making the 32" grind, return to the seat O.D. measurement step above.
•To measure the seat width, use a vernier caliper to measure the width of the 45' angle portion of the seat at several places around the seat.
*lf the seat width is too narrow, repeat the 45* grind until the seat is slightly too wide, and then return to the seat O.D. measurement step above.
*lf the seat width is too wide, make the 60' grind described below.
*lf the seat width is within the specified range, lap the valve to the seat as described below.
• Grind the seat at a 60° angle until the seat width is within the specified range.
OTo make the 60° grind, fit 60° cutter into the holder, and slide it into the valve guide.
OTum the holder, while pressing down lightly.
OAfter making the 60° grind, return to the seat width measurement step above.
• Lap the valve to the seat, once the seat width and O.D. are within the ranges specified above.
О Put a little coarse grinding compound on the face of the valve in a number of places around the valve head.
OSpin the valve against the seat until the grinding compound produces a smooth, matched surface on both the seat and the valve.
С Repeat the process with a fine grinding compound.
[A] Lapper
[B] Valve Seat
[C] Valve
•The seating area should be marked about in the middle of the valve face.
*lf the seat area is not in the right place on the valve, check to be sure the valve is the correct part. If it is, it may have been refaced too much; replace it.
• Be sure to remove all grinding compound before assembly.
•When the engine is assembled, be sure to adjust the valve clearance (see Valve Clearance Adjustment).
Valve Seal Repair
| i | |||
| START) | Machinist's | ||
| dye on seat | |||
| 45° Grind | |
| Tool: | 45° Cutter |
| Purpose: | make seating area |
| smooth and round |
Measure Seating Area O.D.
Tool: Vernier Caliper Purpose: check seat O.D. against spec.
---------------------- 1---------------------
Results
| I |
| OK |
Too small
| 45° Grind | |
| Tool: | 45° Cutter |
| Purpose: | increase O.D. of seat |
| area to spec. |
Too big
Z5Z
Machinist's dye on seat
I
|
Measure Seat Width
Tool: Vernier Caliper Purpose: check seat width against spec.
Results
| I |
| 1 |
I
| OK |
Too narrow
| 45° Grind | |
| Tool: | 45° Cutter |
| Purpose: | increase width of seat |
| area beyond spec, to | |
| increase O.D. |
Too wide
HZ
Machinist's dye on seat
T
|
| Lap Valve | |
| Tools: | Valve lapper, grinding |
| compound | |
| Purpose: | perfectly match valve |
| and seat area; check | |
| valve head for damage |
| С FINISHED) Г |
Cylinder, Pistons
Cylinder Removal
• Remove:
Engine (see Engine Removal/Installation chapter) Cylinder Head (see Cylinder Head Removal) Water Hose
Front Camshaft Chain Guide

|
• Remove the cylinder.
Cylinder Installation
• Install the new cylinder gasket [А]. •Apply engine oil to the cylinder bore.
• Prepare two auxiliary head bolts with their head cut.

|
• Install the two bolts [B] diagonally in the crankcase.
• Position the crankshaft at #2. #3 piston TDC.
• Install the cylinder block [А].
[B] Auxiliary Head Bolts
[C] Pistons
Special Tools - Piston Ring Compressor Grip: 57001-1095

|
Piston Ring Compressor Beit, Ф67 ~ Ф79: 57001-1097
Piston Removal
• Remove the cylinder (see Cylinder Removal).
• Place a clean cloth under the pistons and remove the piston pin snap ring from the outside of each piston.
• Remove the piston pins.

|
Special Tool - Piston Pin Puller Assembly: 57001-910 [A]

|

|
Piston Installation
|
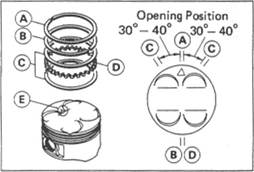
• Do not mix up the top and second ring. О Install the top ring [A] so that the " R" mark [B] faces up. О Install the second ring [C] so that the " RN" mark [D] faces up.
•The piston ring openings must be positioned as shown in the figure. The openings of the oil ring steel rails must be about 30 - 40" of angle from the opening of the top ring.
[A] Top Ring [D] Oil Ring Expander
[B] Second Ring [E] Arrow
[C] Oil Ring Steel Rails
•The arrow on the piston head must point toward the front of the engine.
Piston Wear
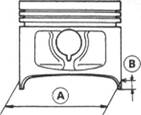
• Measure the outside diameter [A] of each piston 5 mm [B] up from the bottom of the piston at a right angle to the direction of the piston pin.
*lf the measurement is under service limit, replace the piston.
Piston Diameter
Standard: 72.942 - 72.958 mm

|
Service Limit: 72.8 mm
Piston Ring, Piston Ring Groove Wear
•Check for uneven groove wear by inspecting the ring seating.
*The rings should fit perfectly parallel to groove surfaces. If not, the
piston must be replaced. •With the piston rings in their grooves, make several measurements with a thickness gauge [A] to determine piston ring/groove clearance.
Piston Ring/Groove Clearance
Standard Service Limit
Top 0.05 — 0.09 mm 0.19 mm

|
Second 0.03 ~ 0.07 mm 0.17 mm
Piston Ring End Gap
• Place the piston ring [A] inside the cylinder, using the piston to locate the ring squarely in place. Set it close to the bottom of the cylinder, where cylinder wear is low.
• Measure the gap [B] between the ends of the ring with a thickness gauge.
Piston Ring End Gap
Standard Service Limit
Top 0.20 ~ 0.35 mm 0.65 mm
| ma |
|
Second 0.20 - 0.35 mm 0.65 mm
Carburetor Holder
Carburetor Holder Installation • Install the carburetor holder as shown in the figure. [A] Holes
Muffler
Muffler Removal
• Remove:
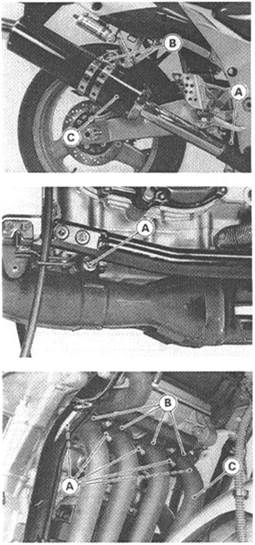
Coolant (drain, see Cooling System chapter) Radiator (see Cooling System chapter) •Loosen the muffler clamp bolt [А].
• Remove the mounting bolt [B] and take off the muffler body [С].
• Remove:
Muffler Clamp Bolt [A]
Holder Nuts [A] Exhaust Pipe Holders [B] •Remove the exhaust pipe [С].
Muffler Installation
•Replace the exhaust pipe gaskets with new ones.
Clutch
Table of Contents
Exploded View........................................................................................................................................ 5-2
Specifications......................................................................................................................................... 5-3
Clutch Fluid............................................................................................................................................ 5-4
Fluid Level Inspection....................................................................................................................... 5-4
Clutch Fluid Change......................................................................................................................... 5-4
Bleeding the Clutch Line................................................................................................................... 5-5
Clutch Master Cylinder.......................................................................................................................... 5-6
Clutch Master Cylinder Removal..................................................................................................... 5-6
Clutch Master Cylinder Installation.................................................................................................. 5-6
Clutch Master Cylinder Disassembly.............................................................................................. 5-6
Clutch Master Cylinder Assembly.................................................................................................... 5-7
Clutch Master Cylinder Inspection (Visual Inspection)................................................................... 5-7
Clutch Slave Cylinder............................................................................................................................ 5-8
Clutch Slave Cylinder Removal....................................................................................................... 5-8
Clutch Slave Cylinder Installation.................................................................................................... 5-8
Clutch Slave Cylinder Disassembly................................................................................................ 5-8
Clutch Slave Cylinder Assembly...................................................................................................... 5-9
Clutch.................................................................................................................................................... 5-10
Clutch Removal............................................................................................................................... 5-10
Clutch Installation........................................................................................................................... 5-10
Clutch Cover Assembly.................................................................................................................. 5-13
Spring Plate Free Play Measurement............................................................................................. 5-13
Spring Plate Free Play Adjustment................................................................................................. 5-14
Clutch Plate, Wear, Damage Inspection......................................................................................... 5-15
Clutch Plate Warp Inspection......................................................................................................... 5-15
Clutch Spring Free Length Measurement....................................................................................... 5-15
Damper Cam Inspection................................................................................................................. 5-15

Apply engine oil.
Apply a non-permanent locking agent. Apply molybdenum disulfide grease. Replacement Parts
Follow the specific tightening sequence. Apply silicone grease (ex. PBC grease).
T5: 11 N-m (1.1 kg-m, 95 in-lb) T6: 9.8 N-m (1.0 kg-m, 87 in-lb) T7: 25 N-m (2.5 kg-m, 18.0 ft-lb) T8: 8.8 N-m (0.90 kg-m, 78 in-lb)
| Exploded View |
T9: 135 N-m (14.0 kg-m, 100 ft-lb)
_____________________________________________________________________ CLUTCH 5-
Specifications
| Item | Standard | Service Limit |
| Recommended Clutch Fluid: | ||
| Grade | D.O.T.4 | ---------- |
| Brand | Castrol Girling-Universal Castro I GT (LMA) Castrol Disc Brake Fluid Check Shock Premium Heavy Duty | ---------- |
| Clutch Lever Position | 4-way adjustable (to suit rider) | ---------- |
| Clutch Lever Free Play | Non-adjustable | ---------- |
| Clutch: | ||
| Spring plate free play (new plates) | 0.05 - 0.35 mm (Usable range) | ---------- |
| Spring plate free play (no new plates) | 0.15 ~ 0.75 mm (Usable range) | ---------- |
| Friction and steel plate warp | 0.2 mm or less | 0.3 mm |
| Clutch spring free length | 42.9 mm | 40.9 mm |
| Special Tools - Inside Circlip Pliers: 57001-143 Clutch Holder 57001-1243 |
Sealant - Kawasaki Bond (Silicone Sealant): 56019-120
|
|
Clutch Fluid
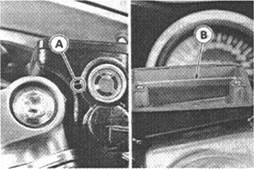
Fluid Level Inspection •Check the clutch fluid level in the reservoir. Lower Level Line[A] Upper Level Line[B]
NOTE
О Hold the reservoir horizontal when checking dutch fluid level.
*lf the fluid level is lower than the lower level line, fill the reservoir to the upper level line in the reservoir.
AWARNING
Change the fluid in the clutch line completely if the fluid must be refitted but the type and brand of the fluid that already is in the reservoir are unidentified.
After changing the fluid, use only the same type and brand of fluid thereafter. Mixing different types and brands of fluid lowers the fluid boiling point and could cause the clutch to be ineffective, it may also cause the rubber clutch parts to deteriorate.
Bleeding the Clutch Line
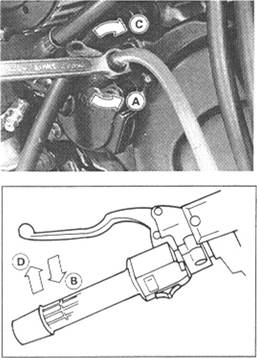
•With the reservoir cap off, slowly pump the clutch lever several times until no air bubbles can be seen rising up through the fluid from the holes at the bottom of the reservoir. This bleeds the air from the master cylinder end of the line.
NOTE
О Tap the dutch hose lightly going from the lower end to the upper end and bleed the air off at the reservoir.
•Attach a clear plastic hose to the bleed valve on the clutch slave cylinder, and run the other end of the hose into a container.
• Bleed the clutch line as follows:
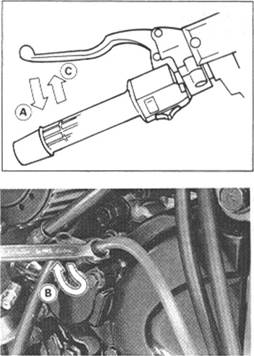
О Pump the clutch lever a few times until it becomes hard and then hold
it squeezed. [A] О Quickly open and close the bleed valve. [B] О Release the clutch lever. [C]
О Repeat this operation until no more air can be seen coming out in to the plastic hose.
О Check the fluid level in the reservoir often, replenishing it as necessary.
NOTE
|
Off the fluid in the reservoir runs completely out any time during bleeding, the bleeding operation must be done over again from the beginning since air will have entered the line.
Clutch Master Cylinder
Clutch Master Cylinder Removal • Disconnect the starter lockout switch connector [А].
• Remove the banjo bolt [A] to disconnect the clutch hose from the master cylinder.
• Unscrew the clamp bolts [B], and take off the master cylinder [C] as an assembly with the reservoir, clutch lever, and starter lockout switch installed.
Clutch Master Cylinder Installation
• Install the clutch master cylinder so that its mating surface [A] positions by 5 mm [B] rearward from the mating surface [C] of the switch housing as shown.
OThe master cylinder clamp must be installed with the arrow mark upward.
OTighten the upper clamp bolt first, and then the lower clamp bolt.
Torque - Clutch Master cylinder Clamp bolts: 11 N-m (1.1 kg-m, 95 In-lb)
• Replace the washers that are on each side of the hose fitting with new ones.
•Tighten the clutch hose banjo bolt. Torque - Clutch Hose Banjo Bolt 25 N-m (2.5 kg-m. 18.0 ft-lb)

|
• Bleed the clutch line (see Bleeding the Clutch Line).
Clutch Master Cylinder Disassembly
• Remove the master cylinder.
• Remove the reservoir cap and diaphragm, and pour the clutch fluid into a container.
• Unscrew the locknut and pivot bolt, and remove the clutch lever.
• Push the dust cover out of place, and remove the circlip.
Special Tool - Inside Circlip Pliers: 57001-143

|

• Pull out the piston [A], secondary cup [B], primary cup [С]. and return spring [0].
_________________ CAUTION_____________
Do not remove the secondary cup from the piston since removal will damage it.
Clutch Master Cylinder Assembly
• Before assembly, clean all parts including the master cylinder with clutch fluid or alcohol.
Clutch Slave Cylinder
Clutch Slave Cylinder Removal • Remove:
Left Lower Fairing (see Frame chapter) Banjo Bolt [A] Mounting Bolts [B] Slave Cylinder [C]