Главная страница Случайная страница
КАТЕГОРИИ:
АвтомобилиАстрономияБиологияГеографияДом и садДругие языкиДругоеИнформатикаИсторияКультураЛитератураЛогикаМатематикаМедицинаМеталлургияМеханикаОбразованиеОхрана трудаПедагогикаПолитикаПравоПсихологияРелигияРиторикаСоциологияСпортСтроительствоТехнологияТуризмФизикаФилософияФинансыХимияЧерчениеЭкологияЭкономикаЭлектроника
Wheels I Tires
|
|
Table of Contents
Exploded View........................................................................................................................................ 9-2
Specifications......................................................................................................................................... 9-3
Wheels (Rims)....................................................................................................................................... 9-4
Front Wheel Removal....................................................................................................................... 9-4
Front Wheel Installation.................................................................................................................... 9-4
Rear Wheel Removal........................................................................................................................ 9-5
Rear Wheel Installation.................................................................................................................... 9-5
Wheel Inspection.............................................................................................................................. 9-6
Axle Inspection................................................................................................................................. 9-6
Balance Inspection........................................................................................................................... 9-6
Balance Adjustment.......................................................................................................................... 9-7
Balance Weight Removal................................................................................................................. 9-7
Balance Weight Installation.............................................................................................................. 9-7
Tires....................................................................................................................................................... 9-9
Air Pressure Inspection/Adjustment................................................................................................. 9-9
Tire Inspection.................................................................................................................................. 9-9
Tire Removal.................................................................................................................................... 9-9
Tire Installation............................................................................................................................... 9-10
Repair.............................................................................................................................................. 9-11
Hub Bearing.......................................................................................................................................... 9-12
Hub Bearing Removal..................................................................................................................... 9-12
Hub Bearing Installation................................................................................................................. 9-12
Hub Bearing Inspection.................................................................................................................. 9-12
Speedometer Gear Housing................................................................................................................ 9-13
Disassembly and Assembly........................................................................................................... 9-13
Lubrication...................................................................................................................................... 9-13

|
G: Apply grease.
R: Replacement Parts
S: Follow the specific tightening sequence.
WL: Apply soap and water solution or
rubber lubricant.
T1: 20 N-m (2.0 kg-m, 14.5 ft-lb)
| Exploded View |
T2: 145 N-m (15.0 kg-m, 110 ft-lb)
Specifications
| Item | Standard | Service Limit | |
| Wheels (Rims): Rim runout: Axial Radial Axle runout/ЮО mm Wheel balance Balance weights | 0.05 mm or less 10 g or less 10 g, 20 g, 30 g | 0.5 mm 0.8 mm 0.2 mm | |
| Tires: Air pressure: (when cold) Front Rear | Up to 165 kg (364 lb) load: 250 к Pa (2.5 kg/cma 36 psi) Up to 165 kg (364 lb) load: 290 к Pa (2.9 kg/cm3, 41 psi) | ----------------------- | |
| Tread depth: Front | BRIDGESTONE: 3.4 mm DUNLOP: 3.4 mm MICHELIN: 5.0 mm | 1 mm 1 mm 1 mm | |
| Rear | BRIDGESTONE: 5.8 mm DUNLOP: 5.9 mm MICHELIN: 7 mm | Up to 130 km/h (80 mph): 2 mm Over 130 km/h (80 mph): 3 mm | |
| Standard tires: | Make, Type | Size | |
| Front | BRIDGESTONE, BATTLAX BT-50F, RADIAL J (tubeless) BRIDGESTONE, BATTLAX BT-54F BRIDGESTONE, BATTLAX BT-50F, SS-TYPE3 DUNLOP, D203FG (tubeless) DUNLOP, D204F J (tubeless) METZELER, ME Z1 FRONT MICHELIN, A89X (tubeless) MICHELIN, TX11 PIPELLI, MTR01 | 120/70 ZR17 | |
| Rear | BRIDGESTONE, BATTLAX BT-50R, J RADIAL (tubeless) BRIDGESTONE, BATTLAX BT-54R BRIDGESTONE, BATTLAX BT-50R SS-TYPE3 DUNLOP, D203G (tubeless) DUNLOP, D204L (tubeless) METZELER, MEZ1 MICHELIN, M89X (tubeless) MICHELIN, TX 23 PIPELLI MTR02 | 180/55 ZR17 |
| Special Tools - Jack: 57001-1238 Inside Circlip Pliers: 57001-143 Bearing Driver Set: 57001-1129 Bearing Remover Shaft: 57001-1265 Bearing Remover Head, Ф25 x Ф28: 57001-1346 |
Wheels (Rims)
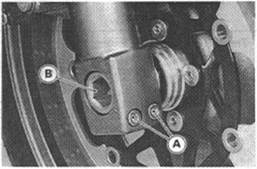
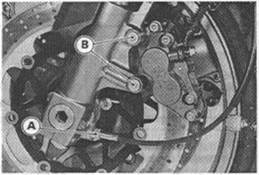
Front Wheel Removal • Remove:
|
Lower Fairings (see Frame chapter) Front Fender (see Frame chapter) Speedometer Cable Lower End [A] Brake Caliper Mounting Bolts [B]
• Loosen:
|
Right Side Axle Clamp Bolts [A] Axle [B]
|

|
• Raise the front wheel off the ground. Special Tool - Jack: 57001-1238
• Pull out the axle to the right and drop the front wheel out of the forks.
|
Л WARNING
Do not attempt to drive the motorcycle until a full brake lever is obtained by pumping the brake lever until the pads are against the disc. The brake will not function on the first application of the lever H this is not done.
Rear Wheel Removal
• Remove:
Lower Fairings (see Frame chapter) Right Lower Fairing Stay Side Stand
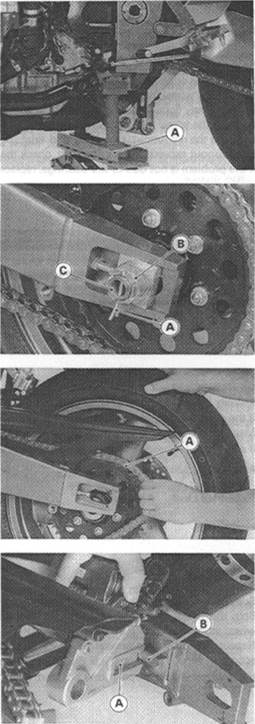
• Using the jack [A], raise the rear wheel off the ground. Special Tool - Jack: 57001-1238
• Remove:
Cotter Pin [A] Axle Nut [B] Axle [C]
• Remove the drive chain [A] from the rear sprocket toward the left.
• Move the rear wheel back and remove the wheel from the rear caliper.
• Remove the rear wheel.
~ CAUTION
A WARNING
Do not attempt to drive the motorcycle until a full brake pedal is obtained by pumping the brake pedal until the pads are against the disc. The brake will not function on the first application of the pedal И this is not done.
Wheel Inspection
• Raise the front/rear wheel off the ground. Special Tool - Jack: 57001-1238
•Spin the wheel lightly, and check for roughness or binding. *lf roughness or binding is found, replace the hub bearings. •Inspect the wheel for small cracks, dents, bending, or warp. *lf there is any damage to the wheel, replace the wheel.
• Remove the wheel, and support it without the tire by the axle.
• Measure the rim runout, radial [A] and axial [B], with a dial gauge. *lf rim runout exceeds the service limit check the hub bearings. *lf the problem is not due to the bearings, replace the wheel.
Rim Runout
|
Service Limit Axial 0.5 mm Radial 0.8 mm
AWARNING
Never attempt to repair a damaged wheel. If there is any damage besides wheel bearings, the wheel must be replaced to Insure safe operational condition.
Axle Inspection
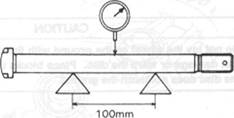
•Visually inspect the front and rear axle for damages. *lf the axle is damaged or bent replace it • Measure the axle runout with a dial gauge. *lf axle runout exceeds the service limit replace the axle.
Axle Runout/100 mm

|
Standard: 0.05 mm or less Service Limit 0.2 mm
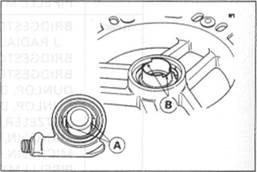
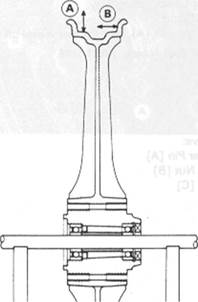
Balance Inspection • Remove the wheel.
•Support the wheel so that it can be spun freely. •Spin the wheel lightly, and mark [A] the wheel at the top when the wheel stops.
О Repeat this procedure several times. If the wheel stops of its own
|
accord in various positions, it is well balanced. *lf the wheel always stops in one position, adjust the wheel balance.
Balance Adjustment
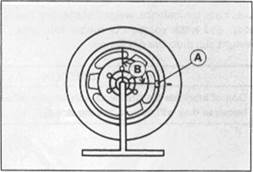
• If the wheel always stops in one position, provisionally attach a balance weight [A] on the rim at the marking using adhesive tape.
• Rotate the wheel V4 turn [B], and see whether or not the wheel stops in this position. If it does, the correct balance weight is being used.
*lf the wheel rotates and the weight goes up, replace the weight with the next heavier size. If the wheel rotates and the weight goes down, replace the weight with the next lighter size. Repeat these steps until the wheel remains at rest after being rotated % turn.
• Rotate the wheel another У* turn and then another'/«turn to see if the wheel is correctly balanced.
• Repeat the entire procedure as many times as necessary to achieve correct wheel balance.
|
• Permanently install the balance weight
Balance Weight
|
Balance Weight Removal (a) When the tire is not on the rim.
• Push the blade portion toward the outside with a regular tip screw driver, and slip the weight off the rim flange.

|
• Discard the used balance weight.
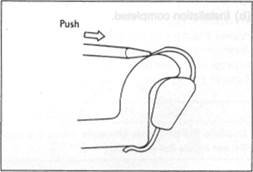
(b) When the tire is on the rim.
• Pry the balance weight off the rim flange using a regular tip screw driver as shown in the figure.
О Insert a tip of the screw driver between the tire bead [A] and weight blade [B] until the end of the tip reaches the end of the weight blade.
|
О Push the driver grip toward the tire so that the balance weight slips off the rim flange.
• Discard the used balance weight.
Balance Weight Installation
• Check if the weight portion has any play on the brade-and-clip plate. *lf it does, discard it.
AWARNING
If the balance weight has any play on the rim flange, the blade and/or clip have been stretched. Replace the loose balance weight. Do not reuse used balance weight
• Lubricate the balance weight blade, tire bead, and rim flange with a soap and water solution or rubber lubricant. This helps the balance weight slip onto the rim flange.
_____________________ CAUTION_____________________

|
Do not lubricate the tire bead with engine oil or petroleum distillates because they will deteriorate the tire.
• Install the balance on the rim.
О Slip the weight on the rim flange by pushing or lightly hammering the
weight in the direction shown in the figure. О Check that the blade and weight seat fully on the rim flange, and that the clip is hooked over the rim ridge and reaches rim flat portion.
Installing Balance Weight
(a) Press or lightly hammer the weight in.
(b) Installation completed.
Tires
Air Pressure Inspection /Adjustment • Measure the tire air pressure with an air pressure gauge [A ] when the tires are cold. * Adjust the tire air pressure according to the specifications if necessary. Air Pressure (when cold)
|
Tire Inspection
• Remove any imbedded stones or other foreign particles from the tread. •Visually inspect the tire for cracks and cuts, replacing the tire in case
of damage. Swelling or high spots indicate internal damage, requiring tire replacement.
• Measure the tread depth at the center of the tread with a depth gauge [AJ. Since the tire may wear unevenly, take measurement at several places.
*lf any measurement is less than the service limit, replace the tire.
Tread Depth Front
Standard: Service Limit
Rear:
Standard: